Home Ski Repair
By Brian May, with expert advice from Grant Nelson
February 28, 2005
So, you’ve been emulating Andrew Newell or maybe (like
me) you’ve headed off-trail one too many times during
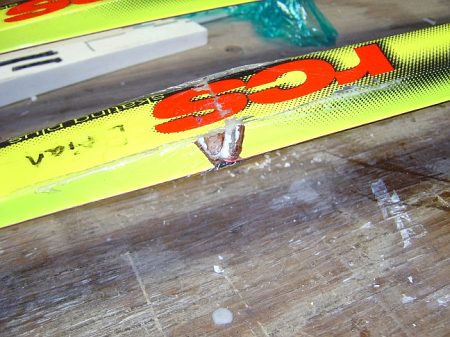
a ski-orienteering race. In any case, you’ve heard the
ominous crack of your ski as its structure disintegrated in
one quick snap. Before your ski heads for the garbage bin,
think about whether it is salvageable. If your base material
is still intact, there is a good chance you can repair your
ski. It will never be the same again, but it may still be
perfectly good for training and rock-ski conditions (and more
ski-orienteering!).
Preparation
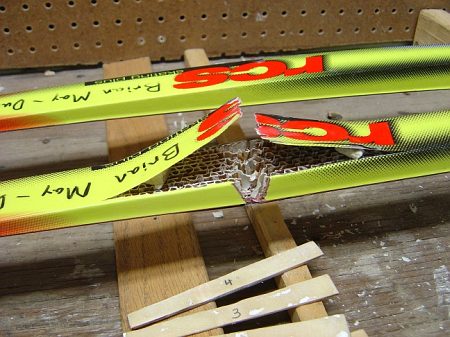
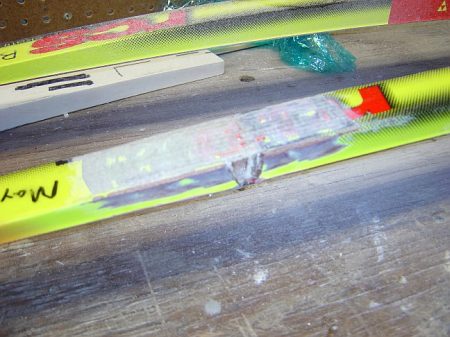
There’s a good chance your ski has a broken top-sheet,
side-walls and internal structure (i.e., the only thing intact
is the base!). In this case, you will want to rebuild it from
the inside out. Before doing anything else, it is a good idea
to iron in a thick layer of glide wax to protect your base
during the repair procedure. Then, you will need to open up
your ski (using a sharp utility knife) and peel back the top-sheet
so you can access the internal structure a couple inches in
front and behind the break.
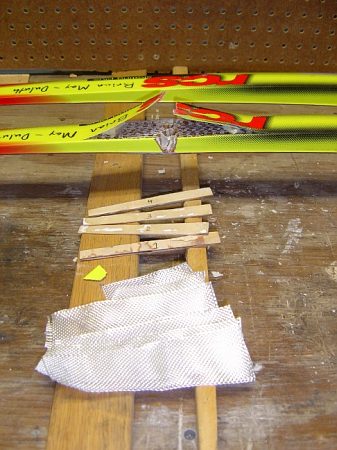
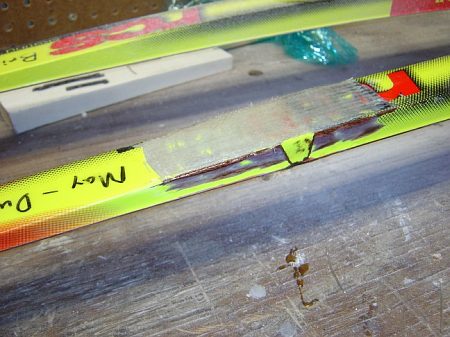
To strengthen the ski, glue a few small pieces of wood or
(cured) fiber-glass within the honey-comb core of the ski.
These pieces should be 4-5 inches long, roughly the height
of the ski core and roughly as thick as a channel in the honey-comb
structure. I use pieces cut from the top-sheet of an old broken
ski, but any piece of light/stiff wood should do the trick.
Channels are cut out of the core (using a utility knife) to
accept the reinforcements. Sand the wood pieces well and ensure
that they can drop all the way down to support the ski base.
Insert the wood pieces, then number them to keep track of
where each piece should go.
I also layer a few pieces of fiberglass between the honey-comb
core and the existing top-sheet, so it is good to cut these
out now and get them ready. A couple of these should be the
full length of the open section, while a couple can be a bit
shorter, to focus the strength where it is needed most.
Internal reinforcement
It’s time to mix up some good-quality epoxy and start
gluing! First, brush some epoxy down into the honey-comb where
the reinforcements will go. Then, coat the reinforcements
with epoxy and drop them into place.
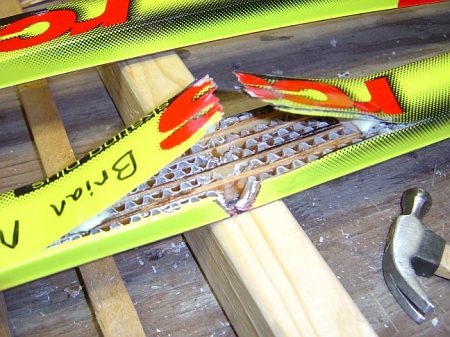
Brush some more epoxy over the top of the honey-comb and
layer down the fiber-glass strips. Ensure that each strip
of glass is saturated before putting down the next layer.
Squeeze the original top-sheets down on top of the glass and
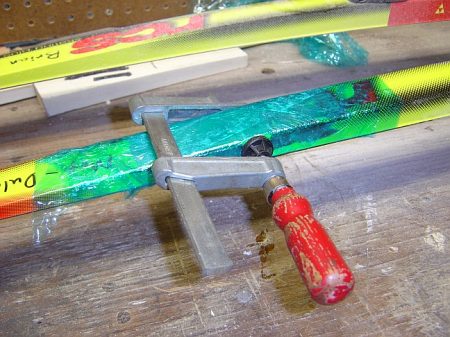
get ready to clamp them down.
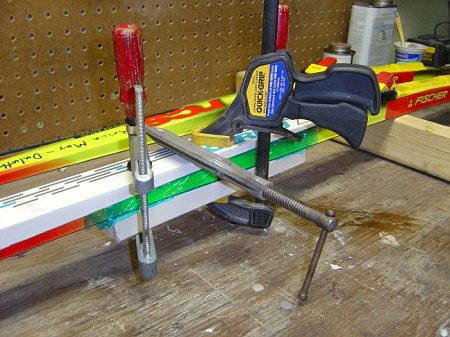
It is important to clamp the ski in a way that will preserve
its original shape (and maybe even flex!). It’s a good
idea to have the other ski on hand to ensure the two skis
have the same final shape. I use a couple of pieces of old
ski to clamp top and bottom (because they have just about
the perfect curvature). I also wrap the broken ski in Saran
wrap first so I don’t glue the whole mess together. Clamp
it down and let it set up overnight.
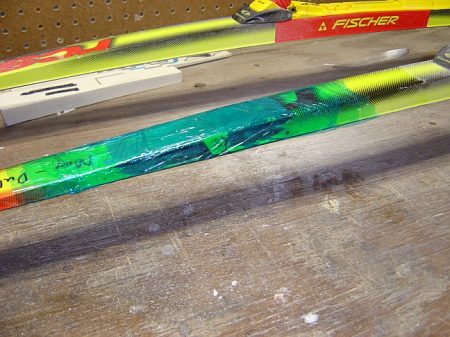
With the clamps and wrap removed, the ski should look something
like this. Note that the ski is still missing a chunk of side-wall
(this could have been glued in during the previous step).
The wood reinforcement is visible through the hole.
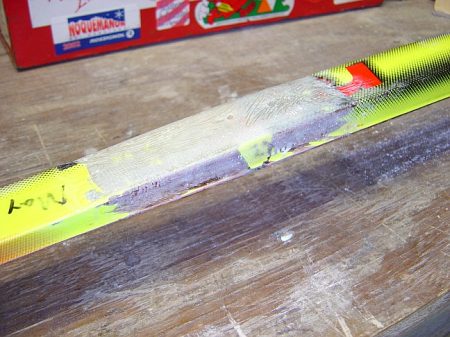
External reinforcement
To add a little more strength to the top-sheet, a couple
more layers of glass can be glued to the top. Sand the ski
down well to ensure a smooth starting point and to ensure
a good bond between the ski and the new layers.
Add a couple of layers of glass to the top surface, saturating
each layer before adding the next. Again, concentrate the
strength near the original break. Here, I have also glued
in the original piece of side-wall.
Wrap tightly with Saran wrap to ensure a smooth finish and
add a clamp to hold in the side-wall piece. Let it set up
overnight.
Final touches
The final step is a single layer of fiber-glass to emulate
the original Cap construction. This will also provide a little
more strength and protection for the side-walls. Sand the
top-sheet and side-walls again to ensure a smooth starting
point. Cut out a piece of glass that will extend over the
top and down over the side-walls. Saturate the final layer
of glass with epoxy and position on the ski.

Wrap tightly with Saran wrap to hold the glass in place and
to ensure a smooth finish.
After letting it sit overnight, unwrap and sand for the final
time. Scrape the wax off the base and go ski!
The end result may not be as pretty as the original and the
ski may never be “race-ready”, but it should serve
as a fully functional ski in the years to come.
|