
Submitting Race Results and Photos
December 7, 2011This article attempts to provide some guidance on how to prepare and publish results and photos, as well as tips on spreadsheets, photography, equipment and even Google Docs.
Results: The Data
The following information should always be included in the results:
- Date of the event
- Location (trail system used)
- Meet title (conference name, etc.)
- Format (skate, classical, pursuit, relay, etc.)
- Distance (in kilometers)
- Weather conditions (optional)
The results should be as complete as possible -- do not submit only the top ten, or only team results. Please include the skiers full name and school in the results, and optionally, the grade level. Times in the results should be generally of the format hh:mm:ss, or mm:ss. Please see the Tips below for suggestions on how to best organize and present your results.
Results: File Formats
Results can be submitted in a number of different formats:
- Link to results page/file or Google document
- Spreadsheet
- Document
- Text email
Links - The biggest advantage of submitting a link is the submitter can make further changes to the results without having to send in new revisions (assuming the link remains the same). The downside is if the link goes dead, we'll no longer have a copy of the results. Google Docs is one the better ways for handling results (see additional notes in the Tips section).
PDF - PDF files are an easy and universal way to share results. PDF ensures the results look the same to everyone, regardless of their computer or browser. And generating PDF is very simple (and free). Please ensure all of the results for a meet/race are contained within a single PDF. See additional PDF notes in the Tips section.
Spreadsheet, Document, Text - Spreadsheets can easily be converted into PDF. The spreadsheet file should contain all of the results. Results can be split into separate worksheets and is encouraged (see Tips below). Word documents or text documents are also accepted. Be aware however that these generally do not format very well (columns might not line up well, etc). When preparing the results, please keep them combined in one file (i.e. don't split the girls and boys and team results into separate files).
Photos
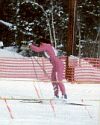
Everyone enjoys looking at photos from events, and we highly encourage you to submit them.
Photos can be submitted in multiple ways:
- Link to photo album
Link - These days, there are dozens of sites that will handle online photo albums. Google's Photos and Apple's iCloud Photos ares very handy and easy to use. Some other top sites include Smugmug and Flickr. Simply upload your photo sets there, then email us a link to the album. This allows the photographer to add/remove photos without resubmitting them, as well as offering larger size options.
Email - Photos can be emailed to us. Unless there are just a few photos, we ask that you resize them before sending to cut down on transmission time and storage (see below).
Photo Set Notes
When preparing photos to email, try to follow these guidelines...
Selection
In general, we ask that photographers submit a representative selection. By this we mean, please don't send us a complete dump of all the photos -- weed out the bad photos first. Also try to eliminate some redundant photos (i.e. four shots in a row of the same skier).
If possible, please try to send photosets that include a range of skiers from the meet (i.e. try not to submit photos of skiers from just one team). Or photos that include the top athletes and/or podium shots.
Sizing
Our preferred format for photos are images that have been resized to a maximum dimension (width and height) of 640 pixels. Free programs like Picasa or IrfanView can quickly resize a collection of photos. If you understand some of the advanced features of JPEG image manipulation: try to squeeze the compression down about 20% from the best quality and turn off EXIF data. This should result in photos that are 75KB or smaller.
Filenaming
We prefer that you do not rename the photo files, as we can use the original photo filename to sort the photos into chronological order.
Sending the Data
Results -- Simply email the results link or attach the results file to an email addressed to . In the email, please include a short summary of the event: Race title, date, location, format (technique), and distance. Optionally, you may include a brief highlight of the race. This highlight should cover the event basics (where, when, format, high school conference, etc) with a recap on the winners and any other interesting tidbits. In general, try to keep the highlights to 3-5 sentences -- no more than 100 words. Double-check the results with the coaches/officials for errors before submitting.
Photos - Email the photo album link or attach the resized photos in an email addressed to . In the email and/or subline line, please specify the event name, date, etc. Please note the photographer's name as well so we can give proper credit on the photosets.
Tips
Photography
Brightness -- Shooting photos in the winter, especially cloudy days, can frequently result in dark images unless you take some special steps.
- Snow Mode - If your camera has a snow/beach setting, use it. This is the simplest way to brighten your photos. Most cameras these days have this mode, check your manual for how to activate it.
- Bump up the Exposure - If you don't have a snow mode, then hopefully you have an exposure control (found on most cameras, especially high end ones), I generally recommend these changes: Increase the exposure one position for sunny days, 2 or 3 positions for cloudy days.
- iPhone/Smartphones - If your phone doesn't have exposure controls, then try this: While viewing the subject, tap on the screen in a dark area of the scene. This will usually refocus the camera to the dark area and will result in it automatically increasing the exposure.
- Post shooting adjustments - If you have a small set of photos and are willing to take the time, you can usually "salvage" dark photos by using some software. Picasa has some very easy to use filters including 'Fill' and 'Auto Contrast'.
Cold Weather -- One of the biggest frustrations with winter photography/video is battery life. The cold weather can sap the battery life quickly. Two tips:
- Spare Battery - A spare battery is an absolute must. And its important to keep that spare battery in a very warm place (next to your skin is one of the best locations).
- Hand-warmers - Not only can those hand-warmer packets keep your hands from freezing, but if you're careful, you can use them to help keep your batteries warm. Just be sure not to overheat the battery; provide some spacing between the hand-warmer and the batteries.
Moisture/Fogging -- Moisture can be a big problem. If you wear eyeglasses, you know when you come inside from the cold your glasses fog over. The same thing happens to your electronics, especially the glass surfaces. So camera lens and smartphone screens will fog over if you bring them directly in from the cold (but no problems going from warm conditions to cold). This condensation can be very bad for your equipment, including possibly shorting out your cellphone. Here's what we recommend: Bring an airtight ziplock bag for the device. Before leaving the cold environment, put the device into the bag and seal it tight. This will provide an "airlock" for your device and will prevent any significant moisture accumulation. Leave the device in the bag until it warms up (or you return to the cold), then you can safely remove it.
Google Docs
If you haven't joined the Google Docs revolution, you should start now. Google Docs is a set of free, online Office products: word processor, spreadsheet, presentation, etc. It uses your standard web browser and stores them online (the cloud!) and thus allows you to access the documents from any computer as long as you have Internet access (and there are ways to even access them 'offline'). And since the documents are online, you can share them with others very easily.
Multiple authors -- So as you may see, Google Docs makes for a great solution for high school meets. You can start a spreadsheet, then share the editing with all the meet coaches, allowing everyone to input their times and make corrections. And when ready, you can publish the document in a read-only form for public viewing.
Old School -- What if you still like working in Excel or Word? Well you can start in those products, then upload the file to Google Docs and it will be automatically converted, thus allowing others to edit and update (without having to pass a copy around by email).
Learn more about using Google Docs
Publishing -- When you have your Google document or spreadsheet ready for publishing, open the document or spreadsheet and select from the 'File' menu, 'Publish to the Web ...'. Once you've Published the document, send the link to us for publishing the results/story. Alternatively, Google documents/spreadsheets can be saved in PDF format, and then emailed to us.
Note: Please generate just one spreadsheet per meet. If you want to separate the events (like boys, girls), then use tabs (see below). Please do not put an entire season into a single spreadsheet, as this can become very difficult to navigate.
Excel/Spreadsheet
Result data breakdown -- The results data should be broken into separate columns. Generally the columns should include: place, fullname, school, grade, and time. Bib number and points may also be included. Place team scores above or below the individual results (not in the same row as individuals).

Breaking down divisions -- Typically a high school meet has separate boys and girls races, and sometimes separate divisions for varsity, junior varsity (JV) and junior high (JH). You can put all of those events into one Excel file by using worksheets. Worksheets are those tabbed entries along the bottom of the window. You can create additional worksheets by right clicking on one of the worksheet tabs and selecting Insert. You can change the tab order by dragging a tab to the new position. You should have one division per worksheet.
Formating the times -- When entering times into Excel, if you only using two digit format, it will assume the time is hours and minutes (hh:mm). So for example, 18:03 is eighteen hours and three minutes. This causes problems with a skier has a time greater than 24 minutes. The way to avoid this problem is to enter the time in three digits, hours, minutes, and seconds: hh:mm:ss. So instead of entering 18:03, enter 0:18:03.
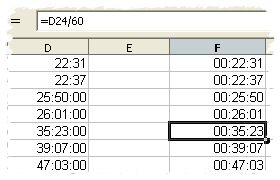 Fixing time values -- If you already entered a bunch of times in two-digit format (hh:mm), there is a quick way to convert them to hh:mm:ss. The steps are:
- Create a new column next to the result times.
- In that new column, create a simple formula: =oldtimecell/60
- Change the formula column cell format to be hh:mm:ss.
- The new column should now have the correctly formatted times -- copy those times.
- Using the Paste Special, paste only the cell values into the old results column.
- Change the cell format for the results to be hh:mm:ss.
- Delete the column with the formulas.
Now you should have your times in hh:mm:ss format. These steps may be slightly different if you use OpenOffice.
PDF files are easy to generate. It basically works just like a printer, but instead the results get placed into a PDF file. There are a number of free PDF generators. Some web browsers, like Google Chrome, have a built-in PDF generator (just change the printer to 'Save as PDF'). If you use a free office suite like LibreOffice or OpenOffice, they have PDF generation built-in. PrimoPDF is a popular free PDF generator that is simple to use and works with Excel and Word documents.
If you use Excel, you can generate a single file PDF from multiple worksheets. Simple choose to print the document to PDF and select the 'Entire Workbook' option. From OpenOffice, you can print multiple worksheets into one PDF by selecting all of the worksheet tabs before you print or export to PDF (hold down the Ctrl key and click on each worksheet tab).